Through the pages in the Users & Permissions tab you can maintain a list of all the members of your site, specify exactly what they should have permission to do within the website, and use a simple interface to get in contact with them all via email. You can even allocate some of your members to be additional administrators to help you maintain the site.
Membership Policy
There are three membership policies that you can choose for your website:
- Open (anyone can join) - if you select this then any registered user of the system can become a member of your site without requiring any approval from administrators. They can join by using the membership menu on your site's homepage. Think carefully before choosing this policy, especially if you allow members to contribute to discussion forums, since it means people you don't know will be allowed to post.
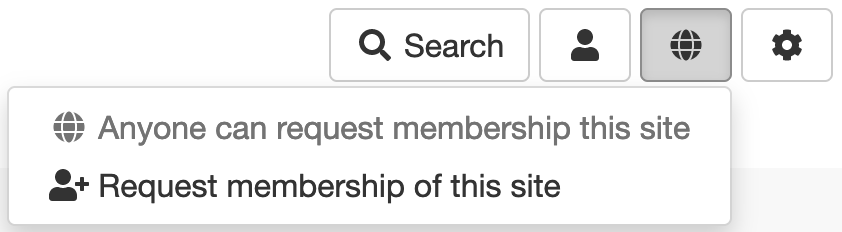
This is how the membership menu looks in the Fresh theme with the Open membership policy: - Closed (membership requires approval) - any registered user can request membership of your site from the membership menu on your homepage. You need to approve their request from the Members page before they become a full member (see Members below).
This is how the membership menu looks in the Fresh theme with the Closed membership policy: - Private (invitation only) - The membership menu not shown on your homepage, and users cannot request membership of your website. Administrators can still invite other users from the Members admin pages though (e.g., if you want to create a new administrator).
In the Fresh theme, it looks like this:

Members
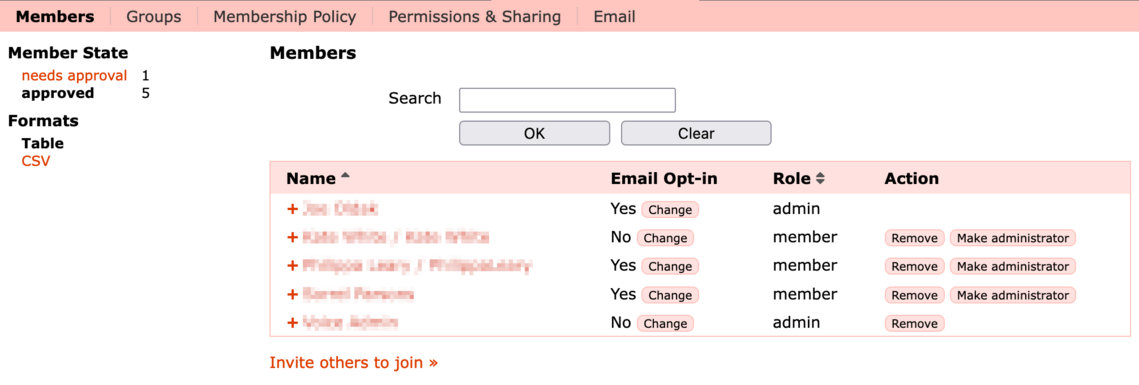
The Members page lists all the members of your website and their current state. It allows you to add and manage your members and administrators.
Members can have one of two Roles:
- A member is someone who has joined your group as an ordinary approved member.
- An admin is someone with administrative rights to your site. You can give administration rights to any member of your group. An administrator has the same capabilities that you do as the main administrator of your site, including the ability to grant and revoke administration rights to other users.
You can change a user's role by clicking the Make administrator or Revoke administration button. Note that you can't revoke admin rights from sitewide administrators, or from yourself!
To stop a user being a member of your website click the Remove button.
The Email Opt-in column shows whether a user chose to receive email notifications when they joined your site (or from their account settings page). If Yes they will receive a notification for new content, such as forum posts. You can change this by clicking the Change button in the appropriate row. Note that you MUST get the user's consent before opting them in to receive emails.
If you have a Closed membership policy, then whenever someone applies to be a member of your website a needs approval filter will appear under Member State on the left of the page. To approve their membership click the filter and then the Approve button next to their name.
The search box allows you to quickly find people in your members list by name or email address - useful if you have a lot of members!
To see the email address of a user click the + symbol that is to the left of the users name.
Inviting Users to Join
If you know the email address of someone you would like to invite to your website, click the Invite others to join link and fill in the details in the displayed form. If the invitee is already registered on the site they will receive an email informing inviting them to click a web link to verify they want to join the group. If that person clicks this link then they are automatically made a member.
If the invitee is not already registered on the site they will receive an email with the relevant web link to register for an account. Once the registration process is complete that person automatically becomes a member of your site, without the normal approval step.
Note, you must enter the exact email address of the user you wish to invite and the registrant must use the same email address when filling out their registration form.
The invitation function does not work if your site is disabled or hidden (e.g. in development).
Groups
You can organise your Members into Groups, which can then have different permissions associated with them. e.g., you could create a Committee group that had access to a different set of pages to normal members.
To do this go to the Groups page then click Add Group. Give the group a suitable name.
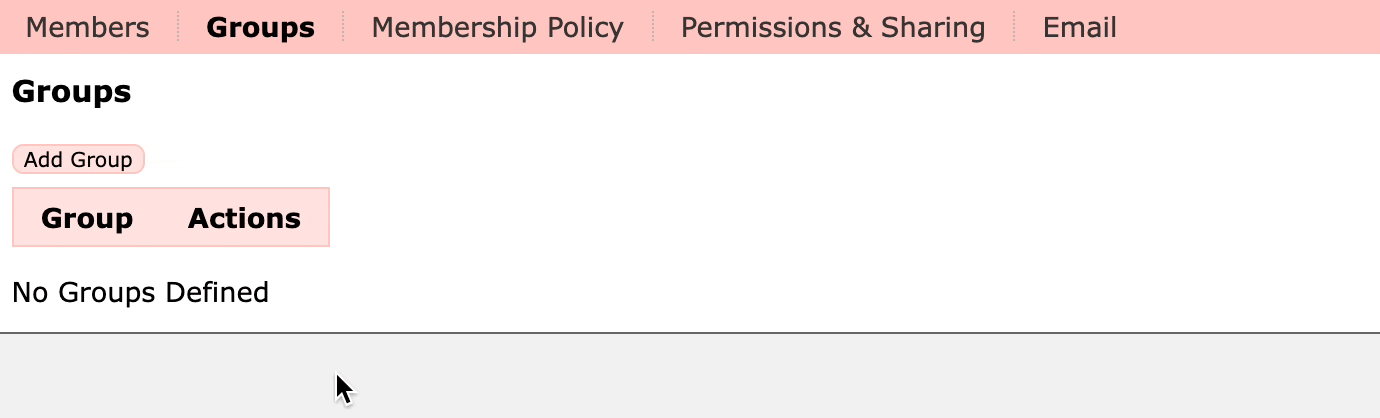
When you return to the Members page you'll see the group appear as a filter in the left column. Next to each user you will now also see a tick box.

To add users to your new group, tick the box next to the users you want to add, then click the Add to group button. Select the group you wish to add them to. These users are now in the group. They still appear in the main members list as they are still normal members of your site too.
To see the members in a group click on the group name in the left column.
If you create a Private Members Area from the Applications page then a Group is automatically created in order to control its membership. Add users to the group to give them access to the Members Area.
Permissions & Sharing
From here you can set the access permissions for your website.
As standard, a site has Read permission granted to The Public (i.e., any visitor regardless of whether or not they are logged in), and Contribute permission granted to Members. This means that your members are able to add content in applications that allow it, such as the discussion forums and photo albums.
Permissions can be changed on a per-page and per-application level. e.g., you can choose to make some content available only for members. For further information see the Permissions & Sharing page.
This page gives you controls and settings for sending emails to the members of your website.
Configure Welcome Email
You can create an email which will be sent to new users when they join your website - for example you may wish to welcome them and invite them to post some information about themselves onto a discussion forum. When an email is being sent the following special keywords (including the curly brackets) will be replaced with the corresponding values.
{first_names} - The first names of the new member
{last_name} - The surname of the new member
{user_account_page} - The account details page for the new member
{site_url} - The URL of your site
Examples of their use can be seen in the default email.
Email Templates
You can create email templates (e.g., newsletters) and save them for later use. If you create an HTML template then you can use the full WYSIWYG editor, and include pictures in your emails.
Once you have created an email template, clicking Send next to the template allows you to choose who you want to send it to, as well as making any further required edits before it is sent.
You can choose to send email only to yourself, rather than to your members, which is useful for testing that the email looks just right when it is received.
When sending email you can also choose to send it only to those users who have opted in to receive email from your site. Usually this is the correct thing to do!
Send Email to Website Users
This allows you to send a custom one-off email to your users, without using one of the predefined templates.
You can also use this to send a special one-time authenticated link to your site, which automatically logs the user in. e.g., this can be useful if you want to send them to a link to a survey but don't want them to have to go through the login procedure first. The one-time authenticated link will only automatically log the user in the first time it is clicked, after that it will behave as a normal link to the URL.